How I Use my Lortone Tumblers (Step-By-Step)
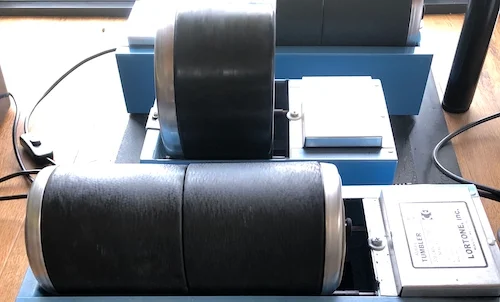
I currently have four six Lortone Tumblers which gives me nine tumbling barrels to use.
- 2 x Lortone 45C (4lb barrel tumblers – I was trying to use for polishing stages only but ended up having too many stones waiting to polish so now all barrels do all stages!)
- 2 x Lortone 33B Tumbler (twin 3lb barrel tumblers)
- 2 x Lortone QT12 Tumbler (1 x 12lb barrel + 2 x 6lb barrels)
If you’ve never used a tumbler before, they can be a little bit loud. Think about a place in the garage or in a room away from your living/sleeping area where you can let your tumbler do its thing and not be too disruptive. My Lortone tumblers are reasonably quiet but I also sit them on a rubber mat to help absorb some of the noise.
Beach stone tumbling is done in four to five (depending on your process) different stages. A thorough cleaning of the barrel is absolutely necessary between each stage. You need to remove ALL of the grit from the barrel and the stones. This is important before moving on to the next stage. What ever you do, DO NOT tip the grit slurry down your sink or drain. It will set like concrete and damage your pipes which will make for a very expensive visit from a plumber!
- About 45 to 55 small stones (up to about 2.5 to 3 cms each in size) will fit into a Lortone 3lb single barrel.
- Stones up to 4 cms big can be polished in the Lortone Model 45C barrel. It can take about twice as many stones (so 90-110) as the 3lb barrel.
- The 12lb barrel is perfect for larger stones/rocks. It can tumble a lot of rocks (approx 260-300 stones) depending on their size of course!
- 6lb barrels can hold approximately 90-120 stones (depending on size). Also great for tumbling a few wider stones/rocks!
What You Need
- Rock Tumbler(s) (personally I think Lortone Tumblers are the best!)
- Beach stones
- Grit – Silicon Carbide
- Tumble Polish Mix or 8000grit Aluminum Oxide or Alumina or Tin Oxide
- Plastic Pellets (dedicated batch for each stage) and/or Ceramic Media
- Water
- Grated Sunlight soap or Ivory Soap
- Borax
- Buckets (at least one for the slurry)
- Storage Containers (I use sistema) for all your untumbled stones/rocks
- Plastic Compartment Containers (optional) to show off/store your favourite polished stones!
Stage 1: Shaping (Coarse: 80/100 grit) or (F60 grit)
The first step in tumbling is to shape with coarse grit. All of the rough and sharp edges are mostly smoothed out during this stage. This stage also helps to reshape stones to more round looking.
I fill the barrel about ⅔ full of stones using an acrylic stick with a ⅔ mark on it for both sized barrels. I try really hard not overfill or underfill my barrels. Next I add the coarse grit to the barrel. Read the manufacturer’s instructions for your tumbler. Be aware they generally recommend a LOT more grit than I am using. I started my tumbling journey using the manufacturer’s suggested amounts.
Other rockhounds have suggested 1 Tablespoon of coarse grit per pound of rocks/stones. Be sure to weigh your rocks first before adding anything else if you want to use this ratio. The amounts I’m using now come from lots of batch testing and documenting results using various amounts of grit suggested by other rockhounds, the manufacturer recommendations and my own thoughts.
I prefer to use 1 Tbspn per lb capacity of the barrel for all grit stages. For example:
- For the 3lb Lortone barrel, I use approx. 3 level Tablespoons of coarse (80/100 grit per load of stones)
- For the 4lb Lortone barrel, I use approx. 4 level Tablespoons of coarse (80/100 grit per load of stones)
- For the 6lb Lortone barrel, I use approx. 6 level Tablespoons of coarse (80/100 grit per load of stones)
- For the 12lb Lortone barrel, I use approx. 12 level Tablespoons of coarse (80/100 grit per load of stones)
A good rule of thumb is that, if you see grit at the bottom of your barrel after one week, you are using too much grit.
I do not add pellets or ceramic media to the first stage. You can if you want but is not necessary. You want those rocks to tumble against each other as much as possible to round off the sharp corners and smooth out those natural pits and gouges.
Finally, fill your barrel with just enough water to cover the stones. Close the lid. Place the barrel on the tumbler and turn it on! In about 10 days I check on the progress of the stones. Are they changing shape? Are they smoother? If so, then it’s time to move onto Stage 2 of the tumbling process.
I have generally found 10 days is better than 7 days. I’ve found the grit is still visible around day 7 but by day 10 the grit is a greyish slurry with no visible grit particles.
Game Changer Update:
(April 2024) If you have been reading my blog posts lately you will have noticed that I haven’t been happy with the final results of many of the batches of stones I’ve been tumbling. After many hours of watching videos and lots of reading and researching I’ve made a number of changes to the actual tumbling process (updated on this page as I’ve changed) and I purchased this game changer equipment from Temu (it’s a cheap version but it sure does work beautifully for me!!) It’s called a Headband Magnifier and it was about NZD$26 – worth every.single.cent! This allows me to check all the stones after Stage 1 before moving them on to Stage 2. I can’t believe how much more closely I can inspect each stone! It’s a game changer! I’m using the 2.5x magnification lens at the moment and it works a treat.
**Small Update to my Tumbling Process:
I’ve started adding in 1 tablespoon (3lb/4lb tumbler) / 1½ tablespoons (6lb tumbler) / 2 tablespoons (12lb tumbler) of borax with the grit cycles. The borax thickens the grit slurry which helps carry it around the stones in the tumbler. This article explains the use of borax quite well. I’m still testing this out and will update here once my testing is complete but so far I’m liking the use of borax in this way.
I am not soap tumbling in between stages anymore either. I do still soap tumble for 2-24 hours after Stage 3 (400grit) before the stones go into the tumble polish mix though. It’s amazing how “grey” the water still is even though I am sure I’ve given the stones a thorough rinsing!
Stage 2: Smoothing (Medium: 220 grit)
After Stage 1 (80/100 or F60grit) I inspect the stones carefully. Any that look like they need to repeat the coarse grit again are removed. Removed stones go in a holding box to wait until another load of stage 1 stones.
Stones ready for stage 2 go back into the barrel. The same process, as above is repeated, except this time I’m using medium (220) grit and ceramic media/plastic pellets. (I have plastic pellets that I only use with 220grit to help minimise cross-contamination). New, never used before ceramic media can be used at Stage 2. However, don’t use ceramic media for the first time in Stage 3 onwards. The edges will not be smooth enough to not scratch the stone’s surface.
Ceramic media and/or plastic pellets help cushion and protect the stones from hitting each other. They can also be used to help “make up the load” if you don’t have enough stones to ⅔ fill the barrel. I much prefer to use ceramic media because it can stay with the stones across the stages. Plastic pellets must be a dedicated lot to each stage to avoid cross-contamination. I’d rather keep plastic out of the environment too.
Unfortunately ceramic media is very hard to get in New Zealand plus it’s really expensive to ship it from Australia! I have bought some from Aussie Sapphire. Relatives have bought it over to NZ in their suitcase for me!
Great news! A NZ supplier, MrGrit now has two sizes of ceramic media available to purchase.
This stage of the tumbling process will remove any scratches, cracks or dimples that might be visible on the stones. It runs for approximately 7-10 days. I personally like to run Stage 2 for 10 days.
Stage 3: Pre-Polish (Fine: 400 grit)
After another thorough cleaning/rinsing, the stones should be ready for Stage 3. It is exactly the same process as before except we’re using 400 grit. I also have dedicated plastic pellets for use with 400grit only or you can continue with the ceramic media.
This stage also takes about a week to 10 days. I use 3 level tablespoons of grit for the 3lb tumbler, 4 level tablespoons of grit for the 4lb tumbler or 6 level tablespoons of grit for 6lb tumbler. Depending on what the stones are often helps me decide if they tumble for 7 days or for 10 days. Generally speaking I have a tendancy to let them run 9-10 days at this stage unless they are mainly sedimentary stones. For example banded argillite or trace fossil stones (also a mudstone or argillite). Sedimentary stones are generally softer than jasper, granites, quartz or quartzites therefore don’t need 10 days at this stage.
Sometimes stones (especially hydrogrossulars which I find quite regularly at Gemstone Beach) don’t need Stage 1-3 as they are already quite smooth. These stones can tumble in very fine 600 grit instead before going into Stage 4 – polishing.
After your final barrel cleaning, rinsing and 3-24 hours in a soap tumble (an absolute must BEFORE you polish to avoid grit contamination in the polish stage) the stones are ready for the polishing stage!
Stage 4: Polishing (Polish Mix)
You MUST use plastic pellets/ceramic media during this stage! They prevent your stones from hitting against each other and ruining all of the hard work you’ve put in so far. I have pellets that I only use for the polishing mix. Consider using a dedicated barrel for polishing only as this will also help with reducing grit cross-contamination.
I prefer to use the plastic pellets over ceramic media during the polish stage. I’ve tested both finding that the plastic pellets appear to do a better job of cushioning the stones than the ceramic media do. There appears to be less “bruising” to the stones when I use the plastic pellets.
The tumble polish powder needs to be mixed with water before being put into the tumbler barrel with stones. I re-use a plastic 1 litre JustJuice container to mix it. I’ve marked the line for the amount needed to fill a loaded tumbler to help ensure I’ve got the right amount.
Currently I’m using this tumble polish mix (it’s fine grade aluminium oxide – 0.5 microns) can be re-used up to six times as it takes longer to lose its effect. I try to use it at least 3-4 times but if it starts to look grey then I’ll tip it out and start a new mix). Polish does not wear away the stones and thus lose it’s “activeness” like grit does.
The polish powder and water is supposed to be mixed to a “paint-like consistency”. I know that with a ⅔ full load in the 3lb barrel there’s enough “liquid” room for approximately 250mls of water.
Watch for cross-contamination. Use a clean plastic bucket with the shaker inside it to collect the mix after the tumble polish. Write the date the mix was used on the side of the shaker plus which size tumbler it was for so you can keep track of how many times you’ve reused the tumble polish. Also noting the size barrel it came out of is handy too!
- For the 3lb Lortone Tumbler, use 3 level tablespoons of polish powder mixed with approximately 250ml of clean water
- For the 4lb Lortone Tumbler, use 4 level tablespoons of polish powder mixed with approximately 350ml of clean water
- For the 6lb Lortone Tumbler, use 6 level tablespoons of polish powder mixed with approximately 550ml of clean water
After a week to 10 days your stones should come out looking nice and shiny whilst wet. In some cases even when they are dry. Remember though, there are some stones that just don’t polish well. I’m working on a post of ones that didn’t take a polish like I thought they would.
I don’t particularly like to polish in the 6lb and 12lb tumbler. I’ve not been happy with the final results when I do. I think that in those bigger barrels the stones are more likely to bruise and pit each other so I have a tendency to only use the 3lb and 4lb barrels for a polish load.
Polish Mix Alternatives
The recommendation for a polish compound is that it is at least 8000grit right up to 12000grit. I’m quite happy with the Tumble Polish Mix mentioned above but I’m also about to try some Aluminium Oxide #8000grit. I’ll update this post once I’ve tested it out.
MrGrit (a new NZ Supplier) has other alternatives for polish too including Cerium Oxide, Tin Oxide and various grades of Aluminium Oxide. As I haven’t used these yet, I am unable to rate their quality.
Stage 5: Burnishing (Borax)
This fifth and final step is referred to as burnishing. It entails immersing the stones in a “heavy soap bath”. I use borax for this and I let the stones tumble for 3 days in borax and water.
Although most tumbled stones look pretty good at the end of Stage 4 (Polishing) this step, in most cases, can significantly improve their lustre and make them truly shine.
Place your polished stones in a cleaned out tumbler barrel. Make sure the barrel is about two-thirds full so the stones aren’t tumbling too much against each other. If you don’t have enough material to fill the barrel add clean plastic pellets. If you need to add cushioning between the stones, add clean plastic pellets. (I have dedicated plastic pellets for Borax only). The burnishing step should be a nice and gentle tumble.
- For the 3lb Lortone Tumbler, use 1 level tablespoon of borax
- For the 4lb Lortone Tumbler, use 1½ level tablespoons of borax
- For the 6lb Lortone Tumbler, use 2 level tablespoons of borax
Other Handy Tips & Links
- Add stones, then pellets (if needed), then water. Add grit last!
- Barrels should be 2/3 filled with stones (sometimes a little less). When adding water to the barrel fill it up to just below the top of the stones.
- Consider keeping a tumbling log. I’m now on the 5th reiteration of my own created tumbling log. You can download the latest one here for free. (Note: new tab will open & the PDF should automatically download to your laptop. You’ll find the pdf file whereever you have your computer downloads set to. (For most people that’s the download folder).
- Remember to weigh the stones and count the number of them before you add the grit and water. (This is optional and only if you are into keeping that data like me!)
- I upload all my Tumbling Stones photos to this Album on Flickr.
- Most of the tips & tricks I’ve picked up have come from JP, author of TumbleStoneBlog. His blog is a wealth of information. JP is one of the nicest, most knowledgable rockhounds in New Zealand. I’ve been lucky enough to meet him in person and fossick with him!
- Nicola Gray, New Zealand Rockhound – YouTube video channel. This amazing lady lives in my hometown and she’s got this awesome rock tumbler called Willy Wonker!
- Mamlambo Rocks – another NZ Rockhound – great videos, especially on Agates and cutting stones.
- Michigan Rocks – Rob from Michigan Rocks shares fantastic videos on rock tumbling. I’ve garnered a lot of tips and ideas from him that have helped shape my tumbling process. He regularly conducts experiments and documents them in video form! Grab a cup of coffee/tea before you sit down to watch cos you’re gonna go down a rabbit hole!!
- Great blog post on Disposing of Grit Slurry
- Don’t let your stones dry out in between stages. More so, polish can harden in little pits and cracks causing damage to your stones. (from Agate Ariel – channel on YouTube)
- Grit can easily transfer from one stage to another (causing scratching). Always tumble your stones in soap for 6-24 hours between each cycle. You will always be surprised at how much more grit is washed out during a soap tumble. (Agate Ariel) I personally only soap tumble stones BEFORE they go into polish (after grit stages are complete).
- Another helpful site: https://www.aussiesapphire.com.au/buying/getting-started-in-rock-tumbling-some-basic-hints/
Tumbling Stages, Quantities and Days
| STAGE | DAYS Tumbling | 3lb Barrel | 4lb Barrel | 6lb Barrel | 12lb Barrel |
| Pretumble | Stone Collection | 45-55 sm/med stones | 80-100 sm/med stones | 90-120 sm/med stones (less if big stones) | 170-220 sm/med or large stones |
| Stage 1 | Coarse: 60grit or 80/100grit, 10 days | 3 Tbspns | 4 Tbspns | 6 Tbspns | 1 cup |
| (Optional) | Soap Tumble: 3-24 hours | (I don’t do this anymore) | |||
| Stage 2 | Medium: 220grit, 10 days | 3 Tbspns | 4 Tbspns | 6 Tbspns | 1 cup |
| (Optional) | Soap Tumble: 3-24 hours | (I don’t do this anymore) | |||
| Stage 3 | Fine: 400grit, 7-10 days | 3 Tbspns | 4 Tbspns | 6 Tbspns | |
| MUST DO | Soap tumble: 3-24 hours | 3-24 hours | 3-24 hours | 3-24 hours | |
| Stage 3a (optional) | Very Fine: 600 grit, 7-10 days | 3 Tbspns | 4 Tbspns | 6 Tbspns | |
| Stage 4 | Polishing: Polish Mix, 7+ (10) days | 4 Tbspns + 250ml water | 5 Tbspns + 350ml water | 7 Tbspns + 550ml of water | |
| Stage 5 | Burnishing: Borax, 3 days | 1 Tbspn | 1 ½ Tbspns | 2 Tbspns |
Supplier Links
- Lortone Tumblers (NZ Supplier)
- Grit (ALL) Supplier: Rock and Gemstone Shop, Rotorua Lapidary Ltd
- *New* NZ Grit/NZ Aussie Sapphire Supplier: Mr Grit (on Facebook) or website (I get grit and ceramic media here plus I bought my Raytech 10lb vibe through MrGrit as well)
- Plastic Pellets (Rock and Gemstone Shop, Rotorua)
- Ceramic Media (Aussie Sapphire)
- Tumble Polish Mix
- Sunlight soap / Borax powder
Post Updates:
May 2025 – slight changes
December 2024 – slight changes
October 2024 – significant changes
July 2024 – slight changes
April 2024 – moderate changes
Another very useful Post, well organised and presented! I have also had good experience with Lortone tumblers. They were apparently designed by a NASA engineer, I’ve heard, having quite a basic and robust design.
Hello! The download link to your tumbling log keeps giving me a 404 error! Is there a way you could forward me a link/the file? I’ve been wanting to build a proper log and would love to see a well made example. Great post and happy tumbling!
Hey Sam
Oh no – that’s not good. It should automatically download a PDF for you (just double-check your downloads folder too). I will email you the PDF log as well! Hope it’s helpful and don’t hesitate to ask any questions!