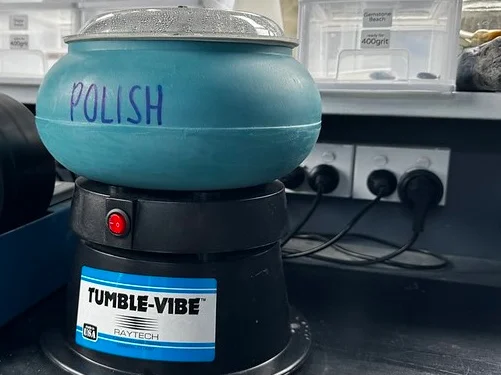
Purchasing the Raytech 10lb vibe has been a game changer for me in terms of reducing the time it takes to tumble and polish a batch of stones.
I alternate my Raytech 10lb vibe with the QT12 (rotary tumbler 12lb) barrel as Stage 1 (60-100grit) MUST be done in a rotary tumbler. Stage 1 grit is too coarse for the vibratory bowl – it’s a hard plastic whereas the rotary tumbler barrel is a hard rubber.
Overview of Stages
Rotary Tumbler
- Stage 1: 60-100grit (silicon carbide)
- 10-14 days (approx)
Vibratory Tumbler (Vibe)
- Stage 2: 220grit (silicon carbide)
- 2 days
- 15min dishwash/water vibe rinse
- Stage 3: 600grit (silicon carbide)
- 2 days
- 15min diswash/water vibe rinse
- Pre-Polish Wash: Borax
- 2 hours
- Stage 4: Polish (tumble polish)
- 2 days
- Final Shine: Borax
- 2 hours
My vibe process (shared below) along with tips and tricks comes mainly from watching this video from “Rock on Utah” on YouTube and my own experiments in tumbling stones. I’ve tested the amounts of grits/polish used during several batches of stones and have landed on the amounts listed below. You can download a “cheatsheet” for free of this process at the end of this post!
Prep for ALL Stages
Load the barrel up with stones (best to run vibe completely full). Fill with water so that stones are completely submerged. Tip off all of the water so that everything is wet.
Mount the bowl and ensure the rubber nut, washer & nut are tight!
Switch on the vibe and sprinkle 2 Tbspns of grit on top of the stones as they move. Add 1 Tbspn of borax if you’re tumbling soft rocks.
You want the rocks tumbling from the outside to inside and around the bowl, moving freely. Use a spray bottle (2-4 sprays at a time) to add more moisture if needed. Check after first 15 minutes – stones should be thick (well coated) but still moving freely.
Stage 2 often drys out so may pay to check your vibe a few extra times during this stage. If needed, spray 2-4 times and WAIT 5-10 minutes before checking again. Check after 12 hours; 24 hours; 36 hours.
Make sure that you clean the bowl, lid, nuts (& rocks) etc well between each stage.
Keep your rocks/stones wet in between stages if necessary.
It is recommended that you do not use any ceramic media in the 10lb vibe – so if I need to “make up a load” I use previous tumbled & polished “filler stones” – usually small hydrogrossular garnets as they are quite hard.

STAGE 2 (220 GRIT) / STAGE 3 (600 GRIT): 2 DAYS (48 HOURS)
Note: Both 220 and 600grit are silicon carbide.
Check after first 15 minutes – stones should be thick (well coated) but still moving freely. Stage 2 often drys out so may pay to check your vibe a few extra times. If needed, spray 2-4 times and WAIT 5-10 minutes before checking again.
Check the vibe after 12 hours; 24 hours; and 36 hours.
After 48 hours (2 days) add a little dish soap, tip in some extra water (about 200mls) and run for 15 minutes. Tip out the bowl and rinse/wash stones really well. Fill the bowl up several times, scrub the bowl (and the stones) with “soapie” brush to clean.
Prior to Polish
After Stage 3 (600grit) is complete and you’ve thoroughly cleaned the vibe bowl and the stones, put the stones back into the vibe bowl, add 2 cups water and 2 Tablespoons of borax to the stones and run for two hours.
STAGE 4 (POLISH): 2 DAYS (48 HOURS)
Note: Polish is Aluminium Oxide – various grades available – I use a 0.5micron grade).
If you have a second bowl dedicated to POLISH ONLY, change to this bowl. (If you don’t have a second bowl you must ensure that your bowl is super clean and free from any grit used in previous stages).
It’s the same prep as for all stages (add clean stones to bowl, fill with water, tip off all water, secure bowl to vibe and switch on, etc).
Sprinkle 1-2 Tablespoons of polish (Alumium Oxide) & 1 Tablespoon of borax on top as the stones are vibrating around the bowl from outside to inside and around, freely.
Check your vibe and stones the same as you check Stage 2/Stage 3 – 12 hours, 24 hours and 36 hours.
After 48 hours (2 days) add a little dish soap, tip in some extra water and run for 10 minutes. Tip out stones and rinse/wash really well. Fill the bowl up several times, scrub with “soapie” brush to clean.
Final Shine
After stones and vibe bowl have been rinsed/washed well, put them back in the vibe bowl, add 2 Tablespoons borax plus 500ml water – run the vibe for 2 hours.
Tip out the bowl contents and rinse them well once more. Tip the stones onto a clean towel and let them dry naturally. Clean the vibe bowl well ready for the next batch!
My Vibe Log:
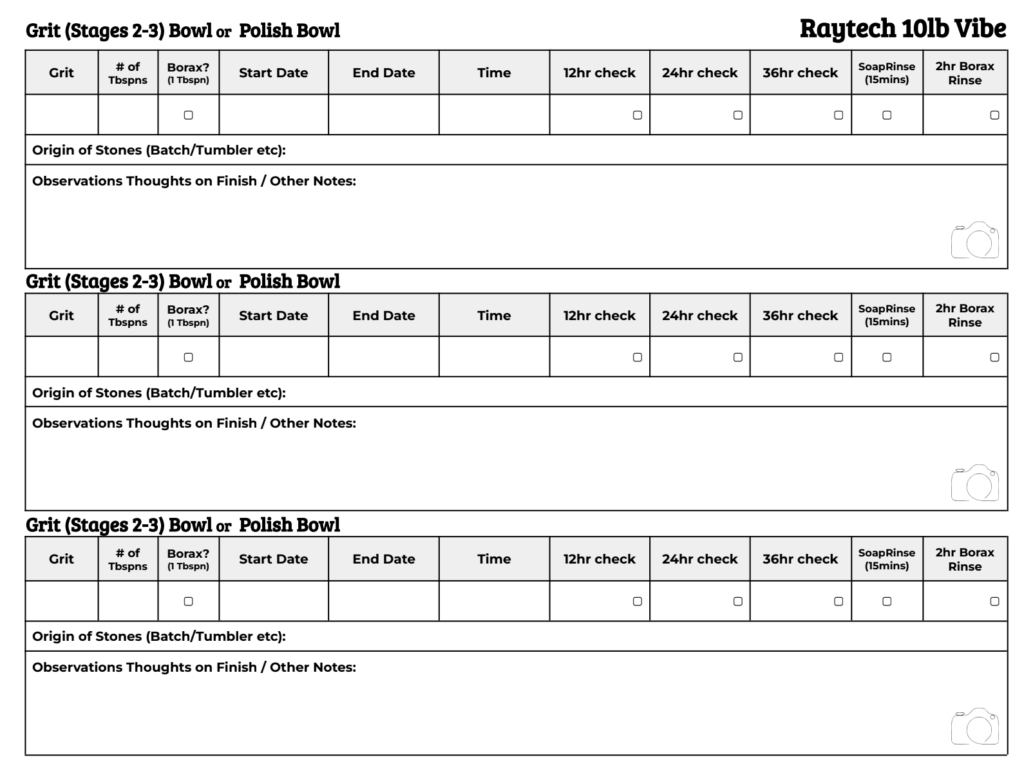
Click here to download a copy of my Vibe Log for free (this link will force an automatic download of the pdf log to wherever your downloads save to on your device).
Click here to download a copy of Raytech 10lb Vibe: Process, Tips & Tricks Cheatsheet (this link will force an automatic download of the pdf log to wherever your downloads save to on your device).
Supplies:
- Tumble Polish (Aluminum Oxide)
Really useful Post for those interested in a vibratory polisher.
Thanks JP! Appreciate you!
Interesting and informative, thank you. I just may have to run out and purchase a Raytech 10lb Vibe!
Hi Graham! If you do, you won’t regret it! I love the vibe!! Game changer!